
A ductless mini split with a refrigerant leak usually gives itself away the same few ways. It cools or heats weakly while running longer, frost or ice forms on the indoor unit's coil, you hear hissing or whistling near the unit or line set, and your electric bill creeps up. On mini splits, the most common leak point by far is a flare connection: the threaded fittings that join the copper line set to the indoor and outdoor units. Leaks also start in the line set itself and in the indoor coil.
For 2026, cost publisher Angi puts a typical ductless mini-split leak repair at about $350 to $1,200. Carrier's repair guide gives $300 to $1,000 for a refrigerant leak repair. Where your bill lands depends on where the leak is. Retightening or remaking a flare costs far less than replacing a coil. Refrigerant isn't consumed, so the key point for your wallet is that a real repair finds and fixes the leak before recharging. A recharge on its own leaves you paying again when the refrigerant escapes a second time.
The next steps are straightforward. Rule out a dirty filter and blocked airflow first, write down any error code, and turn the unit off if it's icing heavily. Then call a certified technician. Handling refrigerant legally requires one, and the rest of this guide explains what that technician should do, what it costs, and when replacing the unit makes more sense.

What Are Mini-Split Low Refrigerant Symptoms?
That's the exact question Trane opens its guide with, and its list matches what homeowners report. Trane's mini-split refrigerant troubleshooting page names weak cooling or heating, a whistling or hissing sound near the indoor or outdoor unit, higher energy bills, and frozen evaporator coils on one or more indoor units. Angi's list of mini-split low refrigerant symptoms adds warm air from the vents, weak airflow, and oily spots around the unit.
None of these proves a leak by itself. Several have ordinary look-alike causes, so it helps to know what each one points to:
| What you notice | Why a leak causes it | Other common cause |
|---|---|---|
| Room never reaches the setpoint; unit runs constantly | Too little refrigerant to carry the heat load | Dirty filter, undersized unit, extreme weather |
| Frost or ice on the indoor coil (cooling mode) | Low charge drops coil temperature below freezing | Clogged filter or dirty blower wheel |
| Hissing or whistling near a unit or the line set | Refrigerant escaping under pressure | Normal expansion-valve sounds right after startup |
| Oily residue at flare nuts or on copper lines | Compressor oil carried out with the leaking refrigerant | Rarely anything else; worth a closer look |
| Higher power bill without higher use | Longer run times to deliver the same comfort | Dirty coils, rate changes, heavier weather |
| Error code on the display or remote | Many units detect abnormal temperatures or pressures | Sensor, communication, or drain faults |
Sources: Trane and Angi mini-split refrigerant symptom guides; Carrier mini split repair guide.
The strongest single sign is oily residue at a flare nut or along the copper. Refrigerant carries a small amount of compressor oil around the system, and when refrigerant escapes, the oil stays behind and collects dust. A greasy, dirty patch right at a fitting is the best clue a homeowner can find without tools.
Does a Mini Split Lose Refrigerant Over Time?
No. People search this question constantly, and the answer shapes everything else in this guide. Carrier's mini split repair guide puts it bluntly: refrigerant is not a fuel and does not get used up, so if it's low, you have a leak. Trane gives the one other explanation: a system shouldn't be low on refrigerant unless there's a leak or it was charged incorrectly at installation.
That's because a mini split's refrigerant circuit is sealed. The refrigerant circulates between the outdoor unit and each indoor head, picking up heat on one side and releasing it on the other. For a walk-through of that loop, see how refrigerants transfer heat inside an air conditioner. A ductless system runs the same cycle without ductwork. Nothing in normal operation burns refrigerant off or wears it out.
Two practical takeaways follow.
- "It just needs a recharge" is incomplete. If refrigerant got out, it will keep getting out until the escape point is sealed.
- A unit that was undercharged from day one looks exactly like a leak. If your mini split has never performed well since installation, mention that to the technician. It points toward an installation charge problem rather than a new leak.
Where Mini-Split Leaks Usually Happen
Where the leak is decides both the cost and the fix. Mini splits have a few weak spots that central systems mostly don't.
Flare connections
Most mini splits connect their copper line sets with flare fittings, where the copper tube end is flared into a cone and clamped with a threaded nut, rather than brazed (heat-joined) the way central-system joints usually are. HVAC School's guide to flaring copper calls flare connections notorious in the trade for being leak areas and notes that their most common use is in mini-split and ductless installs. The usual causes are a poorly made flare, copper that wasn't deburred before flaring, and a nut that was over- or under-tightened. HVAC School warns that over-tightened flare nuts crack the flare and leak. The fix is to tighten to the manufacturer's specified torque with a torque wrench.
A single-zone system has at least four flare joints: two at the indoor unit and two at the outdoor unit. A multi-zone system has more for every indoor head, so a small defect has more places to happen.
The line set
The copper tubing between units can leak from kinks, rubbing against a sharp edge, or damage during construction work. HVAC School's guide to refrigerant leak detection reports that line-set leaks are increasingly common in ductless units and suggests the insulation materials or poor-quality copper may be to blame.
The indoor coil
Evaporator coils can develop pinhole leaks from formicary corrosion, a form of corrosion that chemicals in indoor air can drive. The same HVAC School guide lists these coils among common leak locations. A coil leak inside a wall-mounted head is harder to find and more expensive to fix.
Service ports and valve cores
The Schrader cores in service ports can seep, especially after repeated gauge connections. They're inexpensive to replace, which makes them one of the better leak points to find.
Rule Out the Look-Alikes First
Before paying for leak detection, spend twenty minutes on the causes you can check yourself. A surprising share of "refrigerant" calls turn out to be airflow problems. Trane itself recommends cleaning filters first, since its symptoms can have other causes.
- Clean the indoor unit's filters. Mini-split filters are washable mesh screens behind the front panel. A clogged one starves the coil of airflow, which makes it run cold enough to ice up, the same symptom a leak produces.
- Look at the blower wheel and coil face. A dusty coil or a blower wheel caked with grime (the barrel-shaped fan behind the louvers) cuts airflow badly. Deep cleaning is a professional job, but you can usually see whether it's needed.
- Check the outdoor unit. Clear leaves, snow, and debris, and make sure nothing blocks airflow around it.
- Confirm the mode and setpoint. Mini-split remotes are easy to leave in Dry, Fan, or Auto modes that feel like poor performance.
- Write down any error code. Carrier advises recording any codes shown on the indoor unit or remote so the technician can use them in diagnosis. Take a photo of the display.
If cleaning the filter fixes a frozen coil permanently, you had an airflow problem, not a leak. If the ice comes back with clean filters, or the unit still can't reach temperature, move on to a professional diagnosis.
Is It Safe to Keep Running a Leaking Mini Split?
For short stretches, usually yes. For weeks, no. Running a mini split with a low charge makes it work harder for less comfort, and some consequences cost more than the leak repair itself.
- If the indoor coil is icing, turn the unit off, or run it in fan-only mode, until the ice melts. Continuing to run a frozen coil can overflow the drain pan when the ice melts and can send liquid refrigerant back toward the compressor.
- If you hear a loud, steady hiss, that's a fast leak. Turn the unit off and call for service rather than letting the charge drain completely.
- If performance has dropped only slightly, you can usually keep using it until the appointment. Expect higher bills, and don't let it run for months like that.
The expensive failure to avoid is the compressor. Carrier's repair guide lists compressor replacement at $1,500 to $2,800. A leak left alone long enough can turn a repair of a few hundred dollars into a repair-or-replace decision.
How Do You Fix a Mini-Split Refrigerant Leak?
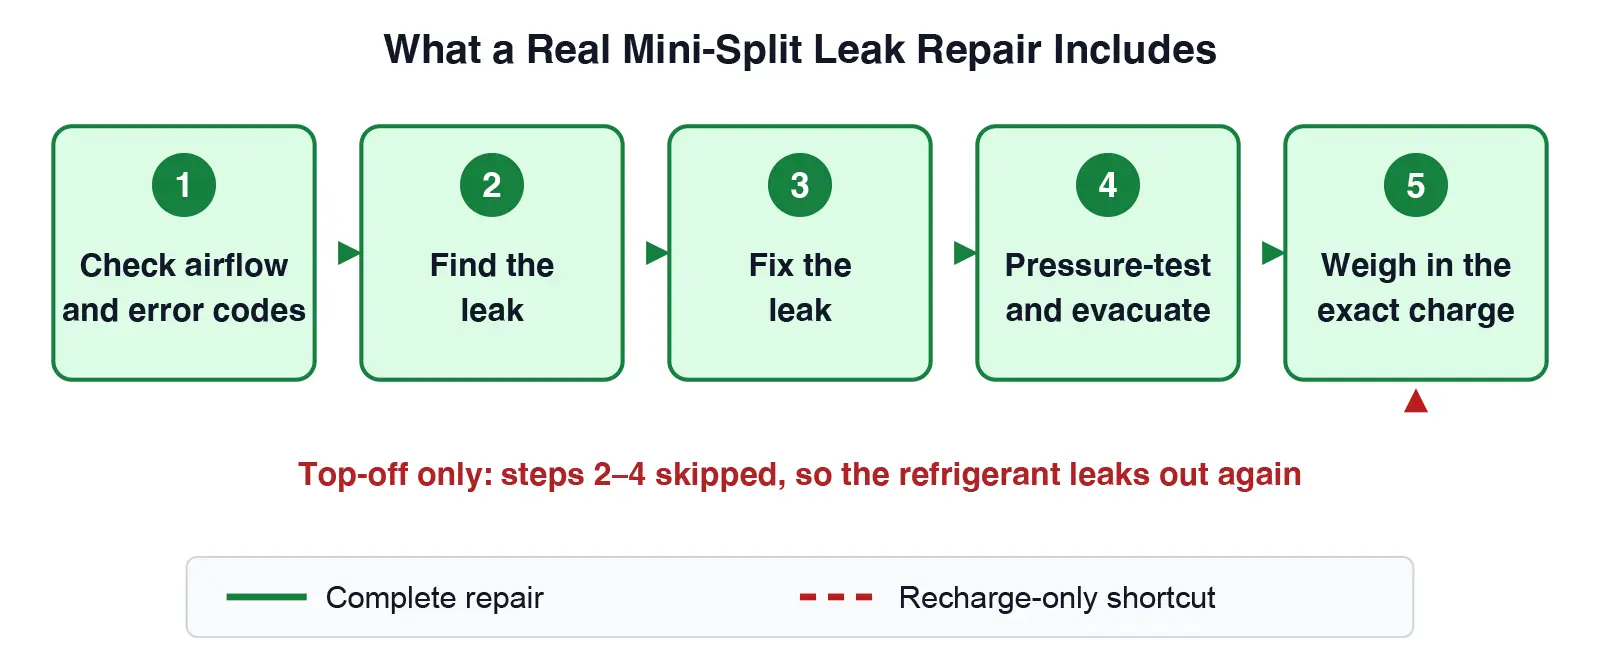
Trane's answer to this exact question lays out the professional sequence: electronic leak detection, bubble testing, recovering the refrigerant, fixing the leak, and pressure testing the system. Trane also notes that sometimes simply tightening the fittings resolves the leak. In practice, a complete repair has five stages.
- Check airflow and error codes. The technician confirms filters, coil, blower, and settings aren't the real problem, then reads the unit's diagnostic codes.
- Find the leak. They use an electronic detector, bubble solution on flare nuts and service ports, and sometimes UV dye. HVAC School describes a nitrogen standing pressure test as a standard way to confirm a leak that's hard to pinpoint: the system is filled with nitrogen and watched for a pressure drop.
- Fix the leak. This can mean retorquing or remaking a flare, replacing a valve core, splicing or replacing a line-set section, or replacing a coil. Any refrigerant left in the system is recovered first, not vented.
- Pressure-test and evacuate. They confirm the repair holds under nitrogen pressure, then pull a deep vacuum to remove air and moisture.
- Weigh in the exact charge. Mini splits are charged by weight to the nameplate amount, plus any additional charge the manufacturer specifies for long line sets. The technician should weigh the refrigerant in, not add it by feel.
The shortcut to watch for is skipping steps 2 through 4: adding refrigerant and leaving. It's cheaper that day and more expensive over the year.
What Mini-Split Leak Repairs Cost in 2026
Costs vary by region, system size, and leak location, but published 2026 figures give a realistic frame. Angi's AC refrigerant leak repair cost guide and Carrier's repair guide break it down this way:
| Repair item | Typical 2026 range | What drives it |
|---|---|---|
| Ductless mini-split leak repair (overall) | $350–$1,200 | Leak location, number of zones, access |
| Leak detection | $100–$450 | How hidden the leak is; nitrogen testing time |
| Seal or valve replacement | $150–$500 | Part type; whether refrigerant must be recovered |
| Refrigerant line repair | $200–$1,500 | Length of line affected; wall or ceiling access |
| Evaporator coil repair or replacement | $600–$2,000 | Coil availability for your model; labor |
| Refrigerant recharge | $150–$500 | Refrigerant type and pounds needed |
| Compressor replacement (if a leak is ignored) | $1,500–$2,800 | Unit capacity; warranty status |
Sources: Angi, "How Much Does AC Freon Leak Repair Cost?" (2026 data); Carrier, "Mini Split Repair Guide" (compressor replacement).
Refrigerant itself is a line item, priced per pound. Angi's 2026 figures are $40–$75 per pound for R410A and $50–$80 for R32. Mini splits hold a small charge compared with central systems, so labor and leak detection, not refrigerant, usually make up most of the bill.
Three questions get you an accurate quote:
- "Is this price for finding and fixing the leak, or just a recharge?"
- "If you find the leak at a flare, will you retorque it or remake it?" Remaking a cracked flare is the durable fix.
- "Will you pressure-test with nitrogen and pull a vacuum before recharging?"
What Kind of Refrigerant Does a Mini Split Use?
Trane raises this question in its own guide, and it matters: your mini split must be recharged with the exact refrigerant on its nameplate, never a substitute.
| Refrigerant | Where you'll find it in mini splits | Worth knowing |
|---|---|---|
| R410A | Most ductless units installed over the past two decades | Still serviceable; supply shrinking under the HFC phasedown |
| R32 | Many newer ductless models | A2L (lower flammability); equipment is designed for it |
| R454B | Some newer systems, more often ducted than ductless | Also A2L; not a replacement for R410A in existing units |
The EPA lists R32 and R454B as acceptable, subject to use conditions, for new residential and light commercial air conditioning and heat pumps.
The A2L label comes from ASHRAE's refrigerant safety classification: "A" means lower toxicity and "2L" means lower flammability. That's another reason sealed-system repairs belong with a technician trained on the refrigerant your unit uses.
Find the refrigerant type on the outdoor unit's data plate, usually on its side or back panel. Many labels also list the factory charge weight. Send the technician a photo when you book. They can check current availability and the right cylinder size before ordering, and come prepared instead of making a second trip. If you have an older system and aren't sure where it falls, recommended refrigerants by air conditioner age maps equipment years to refrigerant types.
Can I Recharge a Mini Split Myself?
No, and the law on this is specific. Trane says plainly that adding refrigerant to a mini-split system is a job for trained HVAC professionals. The EPA's refrigerant sales restriction limits refrigerant purchases to Section 608 certified technicians for stationary equipment like home mini splits, Section 609 certified technicians for vehicle air conditioning, and employers of certified technicians who provide written proof of employment. The only consumer exception is small cans for DIY car air conditioning, which doesn't apply to your home system.
The same EPA page contains a detail that explains why some mini splits are sold as DIY products: the sales restriction does not cover equipment or components that already contain refrigerant. Pre-charged units with quick-connect line sets can therefore be sold to homeowners. That covers buying and installing the pre-charged equipment. It doesn't cover recharging a system once it leaks. Finding the leak, recovering what's left, repairing, evacuating, and weighing in a new charge still takes a certified technician.
What you can do yourself:
- Clean the washable filters and wipe the front panel.
- Keep the outdoor unit clear of debris, snow, and vegetation.
- Watch for ice, listen for hissing, and look for oily residue at fittings.
- Photograph the nameplate and any error codes for the technician.
Repair or Replace Your Mini Split?
Trane's guide asks "Is it time to replace your mini-split system?", which is the question that follows any major leak diagnosis. Carrier's repair guide offers a simple rule of thumb. Repair makes sense when the system is under about 10 years old and the repair costs less than 50% of replacement. Replacement deserves a look for older systems, especially with recurring problems, or when the repair approaches or exceeds half the replacement cost.
For the replacement side of that comparison, Angi's 2026 mini-split installation cost guide puts typical professional installation at $2,000 to $5,000, averaging around $3,000, with single-zone systems ranging from $500 to $5,000 depending on equipment and installation.
| Your situation | Usually points toward |
|---|---|
| Unit under 10 years old; leak at a flare or valve core | Repair |
| Unit under 10 years old; indoor coil leak, parts under warranty | Repair; ask about parts warranty coverage |
| Unit over 10 years old; coil or compressor failure | Get a replacement quote before approving |
| Second or third refrigerant repair on the same unit | Replacement, unless the earlier "repairs" were only top-offs |
| Repair quote at or above half the cost of a new unit | Replacement |
Guideline based on Carrier's mini split repair-or-replace guidance.
One exception to the "repeat leaks mean replace" rule: if the earlier visits only topped off refrigerant and never located the leak, you haven't had a real repair yet. A proper leak search and fix on a sound unit is often still the better value.
The refrigerant also matters over the long run. An R410A mini split can be repaired and recharged for its useful life, but R410A supply is falling on a fixed federal schedule. For what that means over the next decade, see which refrigerants are being phased down in the United States.
How to Keep a Repaired Mini Split From Leaking Again
Most repeat mini-split leaks trace back to workmanship at the flare joints. A few questions and habits greatly improve the odds that a repair lasts.
- Ask whether flares are torqued to spec. HVAC School's standard is a torque wrench set to the manufacturer's flare torque. If the technician reuses an old, marked flare instead of cutting and making a fresh one, ask why.
- Ask for a nitrogen pressure test after the repair. Confirming the joints hold under pressure before recharging catches weak flares on the spot.
- Ask for the recharge weight. A technician who weighs in the charge can tell you exactly how much was added. That number is useful if you ever need to compare it with a future service visit.
- Keep line sets protected. Covers on exterior line sets guard against weather, pets, and yard equipment, and keeping lines clear of sharp edges during home projects prevents rub-through.
- Keep up routine maintenance. Clean filters monthly during heavy use, schedule periodic professional cleaning of the coil and blower wheel, and have the technician check flare nuts for oil residue during visits. A small seep caught early is a quick fix.
If your system was installed recently and is already leaking at a flare, contact the installer first. Workmanship warranties often cover that kind of failure, and it's worth asking before you pay a new company.
Frequently Asked Questions
What are the signs of a refrigerant leak in a mini split?
Weak cooling or heating, longer run times, ice on the indoor coil, hissing or whistling near a unit or the line set, oily residue at flare fittings, and rising electric bills. An error code may also appear on the indoor unit or remote.
Do mini splits need refrigerant refills?
No. Refrigerant isn't used up in normal operation. A mini split that's low has a leak, or was charged incorrectly at installation.
Where do mini splits usually leak?
Most often at flare connections, the threaded joints where the copper line set meets each unit. Line sets, indoor coils, and service-port valve cores are the other common spots.
How much does it cost to fix a mini split refrigerant leak?
Angi's 2026 data puts ductless leak repair at roughly $350 to $1,200, with leak detection alone at $100 to $450. Coil replacement or a compressor failure costs substantially more.
Can I add refrigerant to my mini split myself?
No. Federal rules limit refrigerant purchases for home systems to certified technicians, and a proper repair requires finding the leak, evacuating the system, and weighing in the charge.
Is it OK to run my mini split with low refrigerant?
For a short time, if performance has only dropped slightly. If the coil is icing or you hear a steady hiss, turn it off. Long-term operation with a low charge risks the compressor, which is the costliest part to replace.
Why does my mini split keep losing refrigerant after recharges?
Because the leak was never fixed. Recharging without locating and repairing the leak only refills a system that's still leaking. Ask for a full leak search and a nitrogen pressure test.
Should I repair or replace a leaking mini split?
Repair is usually worth it for units under about 10 years old when the repair costs less than half the price of replacement. Older units, coil or compressor failures, and repeat real repairs point toward replacement.
The Bottom Line
A leaking mini split doesn't need guesswork. Check the filter, clear the outdoor unit, and note any error code. If the ice, weak performance, or hissing continues, call a certified technician. Expect them to find the leak, often at a flare connection, fix it properly, prove the repair with a pressure test, and weigh in the exact charge your nameplate calls for. That full sequence costs more than a quick top-off on the day, and it's what keeps you from paying for the same problem again next season.